Maybe we can help?
Open Chats, Edit Group conversations
1. Access Talk
You must have an active CAMPUS subscription. Launch CAMPUS (log in here) and navigate to the menu icon in the top-left corner. Click it to open the drop-down menu, then select “Talk”.
2. Overview of a group chat
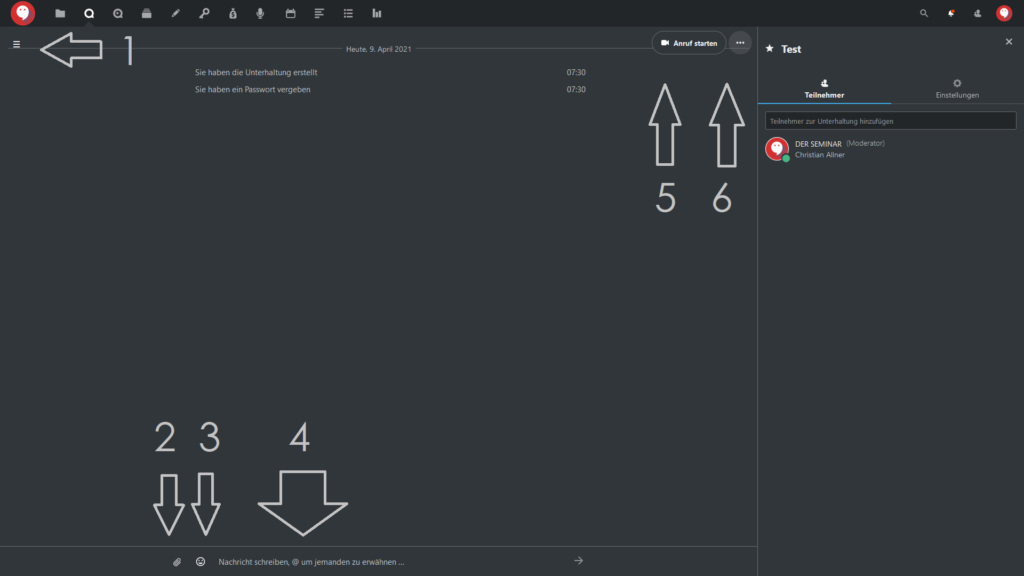
A brief welcome message will be displayed, along with an overview of your existing chats, typically located on the left side of the screen:
Click to enlarge
In chat conversations, you have the following options:
(1) The ≡ icon opens the left-hand menu bar (providing an overview of all group chats and the option to create new ones via the + button)
(2) Upload and insert files into the chat
(3) Insert emojis into the chat
(4) Type text in the chat
(5) Start a video or audio call
(6) Access additional settings
2.1 Chat features in Talk
You can upload files at any time, either directly from your computer or from the cloud storage integrated into DER SEMINAR CAMPUS. You can also insert emojis into your chat conversations.
2.2 Group Chat Settings
To the right of the “Start Call” button, click the “…” icon to access additional settings for Talk, specifically:
-
Full Screen: Expands the chat window to full-screen view. You can exit this view by pressing the “f” key or the “Esc” key.
-
Rename Chat: Allows you to change the name of the group chat.
-
Share Link: Enable or disable the option for users to join the group chat via a link.
-
Copy Link: Only available if “Share link” is enabled; the join link is automatically saved to your clipboard.
-
Password Protection: Set a password to provide additional security for the group chat.
-
Enable Lobby: Activates a lobby feature; participants will wait in a digital lobby until you, as the host, start the group chat.

Click to enlarge
3. Right-hand menu column
The right-hand menu column contains two tabs:
-
Participants
-
Settings
3.1 Edit participants
In the “Participants” tab within the right-hand menu column, you will find an overview of all active (bold color) and inactive (dimmed color) participants, as well as guests participating via a link. You can invite new participants to the conversation and use the “…” function to change each participant’s status or remove them.
3.2 Settings
In the “Settings” tab, you can add a group chat to a project or adjust other preferences.
The settings offer the following options:
-
Select Devices: Choose between different microphones and cameras connected to your device.
-
Folder for Attachments: Define where files should be saved when uploaded to the chat.
-
Keyboard Shortcuts: View an overview of all available keyboard shortcuts.
